Bathroom Reno - Day 8 - Grouting

Tile waiting to be fed some grout.
Look at the gorgeous marble threshold!  Love it!


The job progressed today with the grouting of all the tile.  I'm very happy with our tile choices, it came out really nice with just a few items that the tile installer will need to tweak to get it perfect.
Yuck!


Love It!!!  In my best Oprah voice.


Tile, Tile, Everywhere there's Tile!!!!

Bathroom Reno - Day 7

He got up at 6 am to paint the ceiling. 
Today was exciting as we can really see the bathroom coming together.  Yesterday was a painting marathon as hubby and I tried to get everything painted while the bathroom was empty.  My sweetie got up before 6:00 am to put a coat on the ceiling if the pale aqua paint I picked out.  Unfortunately, it is going to need two coats and Walter was still finishing up the last coat on the walls when the tile installers arrived at 7:15 am.  The tile installer, Bill, worked for 12 hours.  He is letting everything set overnight and will come back in the morning to grout.


 --------------------------------------------------------------------------------------------------

Painting Day

Bathroom Reno - Day 6

The walls were sanded and ready to paint.  Only problem is, the tile installers are coming tomorrow and we need to get the walls primed and two coats of paint on before early in the morning.  It will be much easier to paint now before the new floor, tile and fixtures are installed.  Hubby is at work, so I will attempt to put the primer on and get it ready for him.


Walter worked all evening and painted everything twice.  


Bathroom Renovation Update

I posted some new update and photos on the Bathroom Reno Page:  HERE

Bathroom Reno - Day Two

Today was a little rough . . . lots of noise with Scott and Dave breaking up all the tile and concrete on the floor.  
Here is a photo of the dumpster.
Dave breaking up the floor.


 I was surprised and impressed to find that Dave removed and carried out the Ol' Pink Lady all by himself.  What a He-Man!!!   This tub is cast iron and over 50 years old.  I don't think the new one will last that long.


The specs and instruction sheets still on the old tub.


The end of Day Two saw big progress, the bathroom is completely gutted and all cleaned out now. 


The only thing remaining in the room, my arched ceiling alcove tub area.  I really liked this feature and wanted it saved.


Bye Bye!
The renovation of our bathroom has finally started.  Click below or on the Bathroom Reno Page to see my detailed post about Day One.

http://kroppinkaren.blogspot.com/p/our-bathroom-reno-adventure.html

Rub-a-Dub Tub

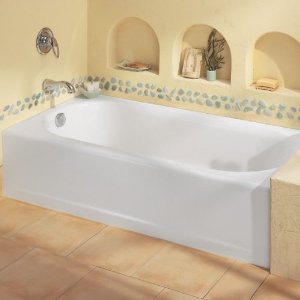
The last major decision on the bathroom reno project was made.  Picking out a bathtub.  As with the toilet, this proved to be a bigger decision than we anticipated.  Should we go with cast iron, acrylic, whirlpool, deep soak, etc. etc.  The only thing that was easy was I wanted white!  I did lots of research and that only confused me.  There were many differing opinions; many people love the acrylic and there were certainly more choices in that material.  Others say cast iron was the only way to go.  We had ruled out a whirlpool tub, due to expense and upkeep--just didn't think we would use it enough.  One thing we found out is that the majority of the home improvement stores did not have tubs you could really sit in, except our favorite store Menards, the Sax 5th Avenue of Home Improvement Stores.
Here's hubby trying out the tubs at Menards.
I was just about to order a tub at my local Lowe's store for the convenience of having the contractor pick it up there.  They had a tub that was 18" deep on display.  I tried it out and couldn't get in it very easily.  I am very vertically challenged and thinking of a time when age will be creeping up, I knew I could buy a deeper tub without risking getting hurt.  So, here is the final decision, a 14" deep tub with a soaker drain.

American WhiteTub Model #2390.202.020     

I also found a deep soak drain which puts the overflow hole at the top and gives you a few more inches of soaking room.  Glad that's all settled.  Reno to start this coming week, stay tuned!

Bathroom Update

I've posted a small bathroom update on the Bathroom Reno Tab here.

The Good, The Bad & The Ugly - My Scrapbook Studio

I am totally re-vamping my scrapbook/rubber stamping studio and will be sharing my progress with you.  Here is a "BEFORE" video.  Hopefully, the "AFTER" video with a new completely organized and clean workspace will be publish during my lifetime!  By the way, this is my first ever YouTube video!


The Tale of Two Toilets


I know must have too much time on my hands to be stressing over which toilet to have installed in my new bathroom . . . but here’s my story and I’m sticking to it.  Would love your comments or opinions please.  Leave a comment by clicking on the Comment box after the post.

Research:  I was told by several people (plumbers, homeowners, etc.) that the Toto brand was the best on the market and to go for a one piece toilet.  I was okay with that and went on an internet search to find the perfect one piece Toto Toilet (don’t ya love the sound of that?).    They ranged in price from $342 to $3,970!!!!  That one would have to get up in the middle of the night for me before I could pay that price!   The one I picked out that I would actually want to buy for the look of it and the features was this one:

Toto MS874114SG-11  at a retail of $891.  The best price I found was $534.00   The problem I had with this was that I would have to buy it on the internet and if something was wrong with it, would have to ship it back.  I wasn’t comfortable with this so back to researching.  What I found when looking at the Toto that I loved was the smooth sides instead of all those curves and nooks and crannies that are so hard to clean.  So now, I know I want the smooth sides and a one piece; also it would have be easy to clean. 


I found this one:  
American Standard Town Square Right Height 1-piece Elongated Toilet Model # 2847.016.020 
I really liked the square-lined look of this and it takes up so much less space than the one we have now.  Also, it is made in the USA, which is a big plus to me.  It has a retail of $895, found on sale at Home Depot online for $455.  I also purchased it using the Ebates program and qualified for a 6% rebate which brought the total to $428.  

Home Depot had free shipping and I could return it to the store and they have a 90 day return policy.  We went ahead and ordered it the last day of the sale on Dec. 31st and it has been sitting in my son’s bedroom  ever since.  Mission accomplished, right?  Wrong!  


See Ebate info here:   Earn Rebates When Shopping Online
When I was in Lowe’s looking for a bathtub (which is another story), I saw this:
American Standard Clean White High Efficiency WaterSense Elongated 2-Piece Toilet Item #8857 at an in-stock price of $253.  That is a savings of $175 on the toilet!   Keeping the budget always in mind I bought this one too and planned on taking the other back to Home Depot.
I did want to check the specs on both and see what the differences were and the main one was that the more expensive toilet was a one piece and had a fancier look to it.  I also found out that the Lowe’s toilet was a special model only sold by Lowes and every review of it mentioned the cheap plastic toilet seat that comes with it.  So, I figured we could just buy a new seat for it and found out the toilet seat on the Town Square model cost $110.  Also, the flush lever was over $50.  So, I guess there are the reasons for the higher price.  The Town Square has a 10 year warranty on the entire toilet, the Lowe’s model is 10 year limited and doesn’t cover the seat or handles. 

So now I’m befuddled and not sure which one to keep.  With only a few days to go, what do you think????
THIS ONE???                                                                                         
OR THIS ONE???

BATHROOM . . . . DECISIONS, DECISIONS, DECISIONS

What comes first, the floor, counter or walls????  Cabinets, toilet or tub???  OH MY!   Long post, bear with me.  Here was the process we went through:

CABINETRY:  This was the no-brainer.  We both fell in love with this ultra-modern cabinetry and although the price was quite a bit more than stock cabinetry, we knew this was the right choice for us.
Magick Woods Royal Plus Vanity and Upper Cabinet

COLOR SCHEME:  Choosing the color scheme was the easy part since the countertop that goes with this cabinet only came in black or brown. My first thought was to do a black and white bathroom, but after receiving the sample of the Mocha Gold countertop, we knew this was the first choice and would go on from there.  The counter material is cultured marble with an intigrated white sink.  I am the ultimate Glitter Girl, so when I saw the glittery gold fleck in it I was sold and ordered the top right away.  
Once we decided to go with a brown countertop for the vanity, we left behind the black and white color scheme we had decided on and went in a different direction.  

TILE:  Didn't think choosing a tile for the bathroom would be so hard.  We found it to be a much larger task than we thought.  First, there were several tiles we liked, but were out of our price range.  Secondly, this is a permanent decision, once the tile is installed, we won't be changing it again in my lifetime.  The next decision that was firm was the wall tile for the shower area.  It was very unusual and I think it will look fabulous with the high gloss white cabinets and the price was just within our reach.  It has a pearly shine and really glows when the light hits it:

Cubica Tile - Genesse Tile
Walter then picked out a high gloss brown marble tile for the floor and I agreed . . . good, done!  NOT.  When we showed it to the tile man, he said it was too big and heavy and would double the cost of the project.  Back to the tile stores I went; several times.  I found a similar tile, not shiny, but with enough color variation that I knew it would work.  I wanted something with a touch of black if possible and it had to have some white to go with all the other white in the bathroom.  

When the color choice was going to be black and white, I had my heart set on some black glass tile to use as an accent/trim and was able to find it in a brown coloration.  Happy Dance!
Mexican Sand Glass Tile - The Tile Shop

Here are our final choices:

Now to decide on the all important fixtures. . . stayed tuned.

So, I caved and bought more scrapbook stuff on HSN

The other day I was flipping through the channels and found HSN had scrapbook day.  Oh no!  I should have kept on flippin', but instead I watched and so I'll be seeing the UPS man again in a week of so.  Here is what I found I could no longer live without!

Xyron Creatopia All-in-One Creative Machine:  Actually a good price, ONLY $59.95


As I mentioned in an earlier post First Xyron Machine, my Xyron machine is about 15 years old and has served me well.  Here is a video of what this machine can do, seems like it will be more versatile and besides, it's purple, how cute is that!
Next up:  The We R Memory Keeps Lucky 8 Punches, like I need another punch in my collection, but tell me this isn't really cool!


So, look for a tutorial video when I receive these new additions to my scrapbook studio.  Now, where to store them; that's another subject in and of itself . . .

Keep Kroppin'!!!

Amazing Photos from CHA

Take a look and start your wish list of all the new products.  Christine Urias, from the site ScrapTime, has taken a huge collection of high quality photos from the Craft and Hobby Association convention.

You look at her Flickr page here: Scraptime Flickr Albums.  Start at the album labelled "CHA Part 1" and prepare to get lost in all the great photos.  Grab a cup of coffee and relax and enjoy.  I saved quite a number of these to my hard drive to use as a screen saver of inspiration while I work.  Have fun!


Saying Goodbye to our Pink Bathroom

After wanting to do this for over 15 years, we are going to gut and remodel out 50's pink and black bathroom!!! Lots of decisions to be made in the coming weeks.  Stay tuned!

If you have an interest in following our renovation journey, click on the bathroom reno page here for all the details and photos.


Making my own Idea Book & Organizing Magazines


I am been systematically going through supplies and am determined to set up the studio of my dreams (within my budget anyway).   This weekend I went through the collections to magazines.  I had these organized in magazine holders which I moved around my scrapbooking space several times over the years.  I have not looked at these since I got them and realized how dumb it was to keep moving and storing them.  I thought I would share my results with you.  I had a really fun time doing this and going down "memory lane".  Wow have our methods, supplies and techniques changed over the years.  I have been scrapbooking since 1995 and never realized how much things have changed.  I had Memory Makers and Creating Keepsakes magazines saved since 1999.  I do remember I stopped getting the CK mags, since I almost exclusively used Creative Memories back then and CK was not my style.  Their pages tended to be very busy with lots of patterned paper and they really specialized in fancy lettering:

Making Memories had cleaner pages and were more my style:
All of the early magazine had many articles about the safety of the supplies used:  ACID FREE being a big buzz word at the time.  
Take a look at the advertisement I came across in one of the old mags.  The Zyron was my first big ticket purchase and I still have my original machine.  I cannot believe the cost of this, almost as much as a Cricut machine!!!  WOW!!!


I have managed to save 10 feet of storage space.  Look at the stack of magazines in the photo and then compare (stack on right) of how much material I saved and thought I would actually refer to.  This photo only shows one magazine holder, I have about 10 of them.  I tore out pages that I thought I might copy the idea, use the title or layouts or just like the general look of the page or color scheme and would use as inspiration.


I really recommend doing this organization project yourself.  It's an easy project to do in front of the television or even on a long car ride or waiting around for your kids at practice.  It was fun to look at old ideas and see how much we have changed and also get some fresh ideas that we will still use today.  The space I saved was huge and well worth the time I took to do this.  I plan to file the articles and pages I saved so I can find them again, and maybe hang a few for inspiration every month in my studio.  My plan going forward is to do this once a year or so from now on.  I don't buy as many magazines as I used to now, so I think that will work out well for me.  I'll post photos of my idea book when I get it finished.  Happy Kroppin'


Blog | Pixels2Pages.net

Blog | Pixels2Pages.net

New Creative Memories Cricut Cartridge is coming out!!!

I have never really liked any of the baby cartridges for my Cricut, so I don't own any of them.  I am hoping I will fall in love with the new one coming out from Creative Memories.  Let me know what you think and if you don't have a consultant, I have a really good one to send you to.  Have lots of scrapping to do for my nieces and my brand new nephew.

 Close to my Heart:  My Close to My Heart Consultant   and Creative Memories:  My Creative Memories Consultant     If you don't already have a consultant, I highly recommend your visiting their websites to place an order or ask any questions you may have about their products.


There is a new Creative Memories Cricut Cartridge that will be available in March.   The cartridge is called "Stork's Delivery" and it coordinates with two new Power Palette Additions from Creative Memories, "Fabulous Baby Girl" and "Rugged Baby Boy."

Zumba Legs!

Well, after a month hiatus, I went to my Zumba class yesterday.  I only lasted 45 minutes, instead of the usual hour, but it felt good to be back exercising again.  I have Zumba Legs, could hardly move last night, but much better today.  Want a fun way to get in shape and get some exercise, TRY ZUMBA!  My friend Sabrina and I love it (she it better at than me, but don't tell her I said so).

Earn Rebates!


Total Pageviews

Copyright

myfreecopyright.com registered & protected

Copyright Notice

All content, including designs, concepts, text and photographs are COPYRIGHT ©2011 Karen Prusiewicz. Original artworks are shared for your personal inspiration & enjoyment only and may not be used for profit, publication or design contest.
Thank you.